伸び縮みするCardViewを作成する(cachapa/ExpandableLayout + RecyclerView + CardViewのサンプル)
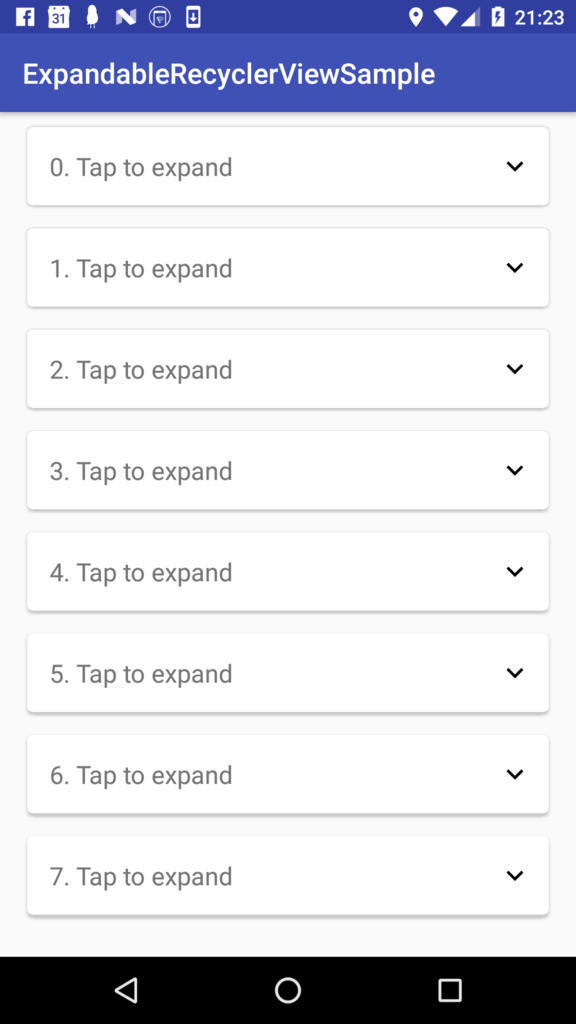
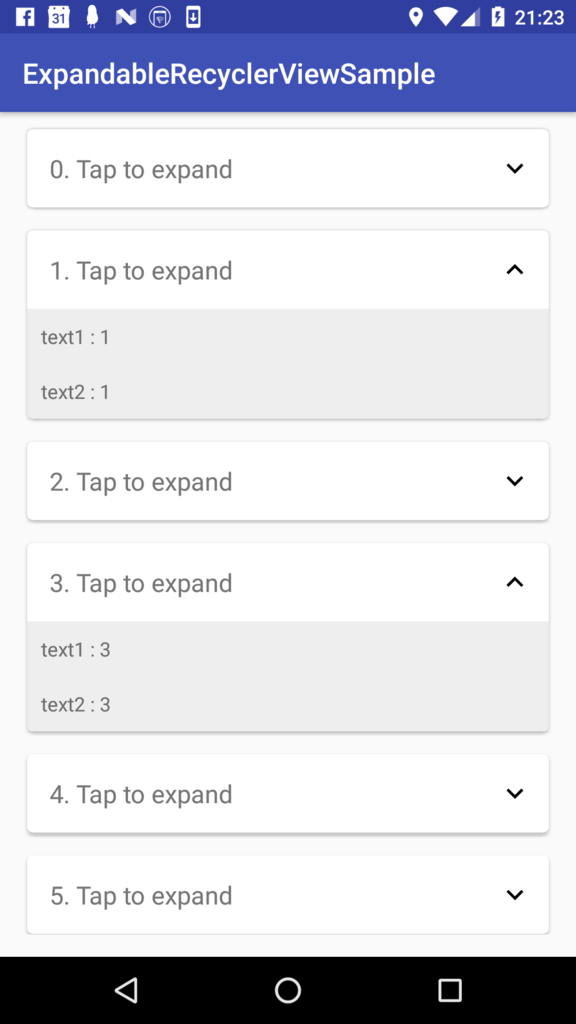
RecyclerViewを使ってリスト表示しているレイアウトがあり、その中でタップするとViewが伸縮するCardViewを表示するレイアウトのサンプルを作ったのでメモです。
ExpandableListViewと似たような表示方法です。

こちらに全体のソースがあります。短いコードですが、ブログを読んでいてサンプルのプロジェクト全体を見たいなあって思うことがあるのでGithubにアップしてます。
github.com
開いたり閉じたりするビューを実装するのにこちらのライブラリを使用させていただいています。
github.com
まずはライブラリの導入から
app/build.gradle
dependencies {
    compile 'com.android.support:appcompat-v7:25.3.1'
    compile 'com.android.support:cardview-v7:25.3.1'
    compile 'com.android.support:design:25.3.1'

    compile 'net.cachapa.expandablelayout:expandablelayout:2.8'
}
レイアウトです。
Activityのレイアウトファイルです。
res/layout/activity_main.xml
<?xml version="1.0" encoding="utf-8"?>
<layout xmlns:android="http://schemas.android.com/apk/res/android">

    <LinearLayout
        android:layout_width="match_parent"
        android:layout_height="wrap_content"
        android:orientation="vertical">

        <android.support.v7.widget.RecyclerView
            android:id="@+id/recycler_view"
            android:layout_width="match_parent"
            android:layout_height="match_parent"
            android:layout_marginBottom="16dp" />

    </LinearLayout>
</layout>
RecyclerViewに表示する1行分のレイアウトです。
CardViewの中にExpandableLayoutを入れ子にしています。
Data Bindingを使用しています。
res/layout/recycler_item.xml
<?xml version="1.0" encoding="utf-8"?>
<layout xmlns:android="http://schemas.android.com/apk/res/android"
    xmlns:app="http://schemas.android.com/apk/res-auto">

    <data>

        <variable
            name="viewModel"
            type="com.sakurafish.expandablerecyclerview.sample.RecyclerItemViewModel" />
    </data>

    <android.support.v7.widget.CardView xmlns:card_view="http://schemas.android.com/apk/res-auto"
        android:id="@+id/card_view"
        android:layout_width="match_parent"
        android:layout_height="wrap_content"
        android:layout_gravity="center"
        android:layout_marginLeft="16dp"
        android:layout_marginRight="16dp"
        android:layout_marginTop="8dp"
        app:cardUseCompatPadding="true"
        card_view:cardCornerRadius="4dp">

        <LinearLayout
            android:layout_width="match_parent"
            android:layout_height="wrap_content"
            android:orientation="vertical">

            <TextView
                android:id="@+id/expand_button"
                style="@style/TextAppearance.AppCompat.Medium"
                android:layout_width="match_parent"
                android:layout_height="wrap_content"
                android:elevation="6dp"
                android:onClick="@{viewModel::onClickExpandButton}"
                android:padding="16dp"
                android:text="@{viewModel.expandButtonText}" />

            <net.cachapa.expandablelayout.ExpandableLayout
                android:id="@+id/expandable_layout"
                android:layout_width="match_parent"
                android:layout_height="wrap_content"
                android:background="#eee"
                app:el_duration="300"
                app:el_expanded="false"
                app:el_parallax="0.5">

                <RelativeLayout
                    android:layout_width="match_parent"
                    android:layout_height="wrap_content">

                    <TextView
                        android:id="@+id/text1"
                        android:layout_width="wrap_content"
                        android:layout_height="wrap_content"
                        android:layout_alignParentTop="true"
                        android:gravity="center"
                        android:padding="10dp"
                        android:text="@{viewModel.text1}" />

                    <TextView
                        android:id="@+id/text2"
                        android:layout_width="wrap_content"
                        android:layout_height="wrap_content"
                        android:layout_below="@+id/text1"
                        android:gravity="center"
                        android:padding="10dp"
                        android:text="@{viewModel.text2}" />

                </RelativeLayout>

            </net.cachapa.expandablelayout.ExpandableLayout>

        </LinearLayout>
    </android.support.v7.widget.CardView>
</layout>
Activityです。
アダプターの中のonBindViewHolderでViewの伸び縮みの制御をしています。
expand()で伸び、collapse()で縮みます。
MainActivity.java
package com.sakurafish.expandablerecyclerview.sample;

import android.content.Context;
import android.databinding.DataBindingUtil;
import android.databinding.ObservableArrayList;
import android.databinding.ObservableList;
import android.os.Bundle;
import android.support.annotation.NonNull;
import android.support.v7.app.AppCompatActivity;
import android.support.v7.widget.LinearLayoutManager;
import android.support.v7.widget.RecyclerView;
import android.view.LayoutInflater;
import android.view.View;
import android.view.ViewGroup;

import com.sakurafish.expandablerecyclerview.sample.databinding.ActivityMainBinding;
import com.sakurafish.expandablerecyclerview.sample.databinding.RecyclerItemBinding;

import java.util.List;

public class MainActivity extends AppCompatActivity {

    ActivityMainBinding binding;

    @Override
    protected void onCreate(Bundle savedInstanceState) {
        super.onCreate(savedInstanceState);

        binding = DataBindingUtil.setContentView(this, R.layout.activity_main);

        binding.recyclerView.setLayoutManager(new LinearLayoutManager(this));
        ObservableList<RecyclerItemViewModel> list = new ObservableArrayList<>();
        for (int i = 0; i < 50; i++) {
            RecyclerItemViewModel viewModel = new RecyclerItemViewModel("text1 : " + i, "text2 : " + i);
            list.add(viewModel);
        }
        binding.recyclerView.setAdapter(new ListAdapter(this, list));
    }

    private static class ListAdapter extends RecyclerView.Adapter<ListAdapter.ViewHolder> {

        public ListAdapter(@NonNull Context context, @NonNull ObservableList<RecyclerItemViewModel> list) {
            this.context = context;
            this.list = list;
        }

        private final Context context;
        private final List<RecyclerItemViewModel> list;

        @Override
        public ViewHolder onCreateViewHolder(ViewGroup parent, int viewType) {
            return new ViewHolder(context, parent);
        }

        @Override
        public void onBindViewHolder(final ViewHolder holder, int position) {
            final RecyclerItemViewModel viewModel = getItem(position);
            if (viewModel.isExpanded()) {
                holder.binding.expandButton.setSelected(false);
                holder.binding.expandableLayout.expand(true);
            } else {
                holder.binding.expandButton.setSelected(false);
                holder.binding.expandableLayout.collapse(true);
            }

            viewModel.setOnClickListener(new View.OnClickListener() {
                @Override
                public void onClick(View v) {
                    if (viewModel.isExpanded()) {
                        holder.binding.expandButton.setSelected(false);
                        holder.binding.expandableLayout.collapse(true);
                    } else {
                        holder.binding.expandButton.setSelected(true);
                        holder.binding.expandableLayout.expand(true);
                    }
                    viewModel.setExpanded(!viewModel.isExpanded());
                }
            });

            viewModel.setExpandButtonText(position + ". Tap to expand");

            holder.binding.setViewModel(viewModel);
            holder.binding.executePendingBindings();
        }

        @Override
        public int getItemCount() {
            return list.size();
        }

        public RecyclerItemViewModel getItem(int position) {
            return list.get(position);
        }

        public class ViewHolder extends RecyclerView.ViewHolder {

            RecyclerItemBinding binding;

            public ViewHolder(Context context, ViewGroup parent) {
                super(LayoutInflater.from(context).inflate(R.layout.recycler_item, parent, false));
                binding = DataBindingUtil.bind(itemView);
            }
        }
    }
}
DataBindingで使用しているビューモデルのクラスです。
RecyclerItemViewModel.java
package com.sakurafish.expandablerecyclerview.sample;


import android.databinding.BaseObservable;
import android.databinding.Bindable;
import android.support.annotation.NonNull;
import android.view.View;

public class RecyclerItemViewModel extends BaseObservable {

    private String expandButtonText;
    private String text1;
    private String text2;

    private View.OnClickListener onClickListener;
    private boolean expanded = false;

    RecyclerItemViewModel(@NonNull String text1, @NonNull String text2) {
        this.text1 = text1;
        this.text2 = text2;
    }

    public String getText1() {
        return text1;
    }

    public String getText2() {
        return text2;
    }

    @Bindable
    public String getExpandButtonText() {
        return expandButtonText;
    }

    public void setExpandButtonText(@NonNull String expandButtonText) {
        this.expandButtonText = expandButtonText;
    }

    public void onClickExpandButton(View view) {
        if (onClickListener != null) {
            onClickListener.onClick(view);
        }
    }

    public void setOnClickListener(@NonNull View.OnClickListener onClickListener) {
        this.onClickListener = onClickListener;
    }

    public void setExpanded(boolean expanded) {
        this.expanded = expanded;
    }

    public boolean isExpanded() {
        return this.expanded;
    }
}
以上です。
追記 2017/05/06
上記のサンプルに伸縮を表すアイコンを追加しました。


アイコンはGoogle製マテリアルデザインのアイコンで、ベクター画像を使用しています。
手前味噌で恐縮ですが、こちらのページの方法でxmlを追加しました。
sakura-bird1.hatenablog.com
ビューを開いた状態と閉じた状態で表示する画像を変更するのにselectorを使用しています。
res/drawable/expand_arrow.xml
<?xml version="1.0" encoding="utf-8"?>
<selector xmlns:android="http://schemas.android.com/apk/res/android">
    <item android:drawable="@drawable/ic_expand_more_black_24dp" android:state_selected="true" />
    <item android:drawable="@drawable/ic_expand_less_black_24dp" android:state_selected="false" />
</selector>
ImageViewでsrcで画像を指定する箇所を
app:srcCompat="@drawable/expand_arrow"
という風にselectorを定義したxmlファイルの名前にしておきます。
ビューを押すタイミングでsetSelected(boolean)メソッドでselectedの状態を切り替えます。
これでビューを押すたびに画像が変更されますが、せっかくなのでアニメーションも付けました。
        @Override
        public void onBindViewHolder(final ViewHolder holder, int position) {
            final RecyclerItemViewModel viewModel = getItem(position);
            if (viewModel.isExpanded()) {
                holder.binding.expandButton.setSelected(false);
                holder.binding.expandableLayout.expand(true);
            } else {
                holder.binding.expandButton.setSelected(true);
                holder.binding.expandableLayout.collapse(true);
            }

            viewModel.setOnClickListener(new View.OnClickListener() {
                @Override
                public void onClick(View v) {
                    if (viewModel.isExpanded()) {
                        holder.binding.expandButton.setSelected(false);
                        holder.binding.expandableLayout.collapse(true);
                    } else {
                        holder.binding.expandButton.setSelected(true);
                        holder.binding.expandableLayout.expand(true);
                    }
                    // 画像を180度回転させる
                    ObjectAnimator anim = ObjectAnimator.ofFloat(holder.binding.expandArrow, "rotation", 0, 180);
                    anim.setDuration(150);
                    anim.start();

                    viewModel.setExpanded(!viewModel.isExpanded());
                }
            });
(中略)
        }
超うっかりで落胆。freeeを退会しようとしてネットで手続きしたけど、営業時間内でないと再申し込みしないといけないのを忘れて会費を引き落とされた。
私が忘れたのがいけないのですが、共有しておけば誰かの役に立つかもしれないので書いておきます。
フリーランスの青色申告に役立つ会計アプリケーションのfreeeってありますよね。
今までこれを使って便利だったのですが訳あって解約することにしました。
退会する方法はこれですね。
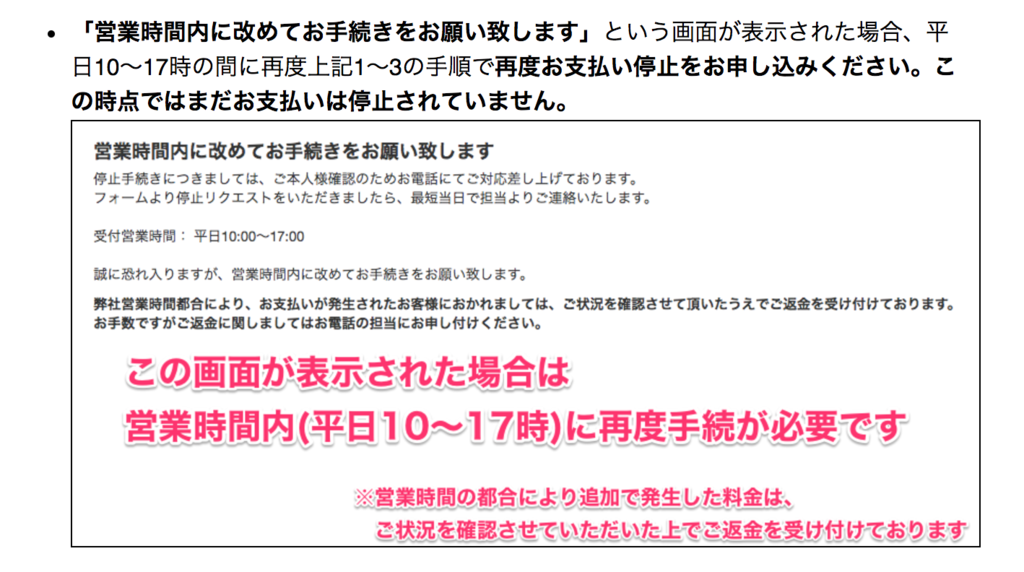
で画面の指示に従って「お支払い停止手続きに進む」を押したのですが、次のような画面が表示されました。
画像は公式サイトからです。

ちゃんと読めば書いてあるんだけど、どうも当時の私は向こうから電話がかかってくるんだなと思って忘れてしまいました。
手続きのリンクを踏んだことでとりあえず退会の申し込みはしたような気になってしまいました。
それで電話を待てばいいのだろうとのんきに構えていました。
当然何事も起こらず電話もかかってくることなくばっちり会費を引き落とされていました。

あーもったいない。
ぼんやりしすぎな自分に対する怒りがこみ上げてなんだか落ち込みました。
受付できませんでしたとか自動配信メールくれてもいいのに、とかちょっと思いましたが、
退会はどこもわかりにくかったり面倒くさいことが多いので気を引き締めていかなければなりませんね。
さっきあらためて停止手続きをしたのですが、確認の自動配信メールとか何も来ていないです。
あと、公式サイトにある「お支払い停止リクエストフォーム」が表示されなかったのですが、
チャットで質問したほうがいいのかどうか迷いますが、これから電話かかってくると思うのでその時に聞いてみようと思います。
こういうものなのでしょうかね。
ポケット糖質量にスマホ向けAPIを追加
こんにちは。さくらです。
www.pockettoushituryou.com
ポケット糖質量でスマホのクライアントアプリを作りたいなと思っています。
サイトの横幅を縮めると下の画像のように縦長で間延びして見辛い印象です。

とりあえずAndroid版を作って(iOS版も作りたいけどスキルがないのだった)みようと思っています。
今日はそれ用のAPIを追加しました。
最初grapeというgemを使ってAPIを書こうと思っていたのですが、自分のアプリにはいらない気がしてrailsデフォルトのまま作っています。
/api/v1/kinds
のような形でアクセスできるようにnamespaceをこのように定義しています。
config/routes.rb
Rails.application.routes.draw do

  namespace :api, format: 'json' do
    namespace :v1 do
      resources :kinds, :foods
    end
  end
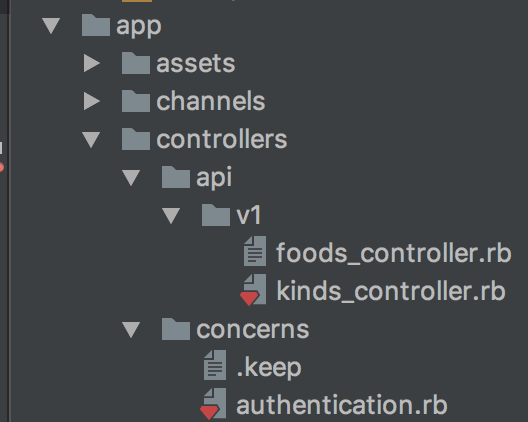
フォルダはこのような構成です。

コントローラーはこんな感じです。
app/controllers/api/v1/kinds_controller.rb
module Api
  module V1
    class KindsController < ApplicationController
      include Authentication

      before_action :authenticate

      def index
        @kinds = Kind.all
        j = @kinds.to_json(only: [:id, :name, :type_id])
        render json: j
      end
    end
  end
end
include Authentication としているのは、上のフォルダの構成の画像で言えば
app/controllers/concerns/authentication.rb
のAuthentication Moduleになります。
HTTPヘッダーに付加するトークンで認証処理をしています。
こちらを参考にさせていただきました。ありがとうございます。
qiita.com
ソースはこんな感じです。
app/controllers/concerns/authentication.rb
module Authentication
  # you might need to include:
  # include ActionController::HttpAuthentication::Token::ControllerMethods

  def authenticate
    authenticate_token || render_unauthorized
  end

  def authenticate_token
    authenticate_with_http_token do |token, options|
      token == ENV['HTTP_HEADER_TOKEN']
    end
  end

  def render_unauthorized
    # render_errors(:unauthorized, ['invalid token'])
    obj = { message: 'token invalid' }
    render json: obj, status: :unauthorized
  end

end
これで特定のトークン文字列がヘッダーに付加されていなかったらアクセス拒否されます。
確認はコマンドラインから次のように叩きます。成功するとJsonが表示されます。
curl -X GET -H 'Authorization: Token hogehoge' -H 'Content-Type:application/json' http://localhost:3000/api/v1/kinds
ブラウザから確認する場合はChrome Extensionなどのツールでヘッダーを付加できるツールがあるので活用しつつURLのところに
http://localhost:3000/api/v1/kinds
と入力します。私は教えてもらったModHeaderを使用しました。下の画像のように入力します。

サーバーにHTTP_HEADER_TOKENの環境変数を設定するのを忘れないようにします。
私の使っているサーバーはherokuなのでこのようなコマンドになります。
$ heroku config:set HTTP_HEADER_TOKEN="hogehoge" --remote staging

$heroku config:set HTTP_HEADER_TOKEN="hogehoge" --remote production
あとはデプロイしてstaging,productionのドメインでテストします。
2017/04/17追記
jsonを作る箇所をこのように定義していましたが、これだと思ったようなJsonの形にならないので変更しました。
        @kinds = Kind.all
        j = @kinds.to_json(only: [:id, :name, :type_id])
        render json: j
結果は↓のように、配列には名前が付いていません
[{"id":1,"name":"穀類","type_id":1}
,続く]
↓のように配列にkindsという名前を付けたいのでした。
{"kinds":[{"id":1,"name":"穀類","type_id":1},続く]}このように変更して望みどおりになりました。
        kinds = Kind.select('id, name, type_id')
        hash = { :kinds => kinds }
        render :json => hash
|
|
|
|
|


